Battery switch on travel trailer function is crucial for managing your RV’s power. Understanding how your battery switch works is key to preventing electrical problems and ensuring a smooth camping experience. This guide will walk you through different switch types, safe connection procedures, troubleshooting tips, and important safety precautions, equipping you to confidently manage your travel trailer’s power system.
We’ll cover everything from the basics of single-pole switches to the more advanced double-pole double-throw options, showing you how to safely connect and disconnect your batteries, and what to do when things go wrong. Think of this as your go-to guide for all things related to your travel trailer’s battery switch – your trusty companion for worry-free RV adventures.
Battery Switch Types in Travel Trailers
Choosing the right battery switch for your travel trailer is crucial for managing power and ensuring safe operation. Different types offer varying levels of control and protection. Understanding their functionality is key to making an informed decision.
Single-Pole Battery Switches, Battery switch on travel trailer function
A single-pole switch is the simplest type. It essentially acts as an on/off switch for a single battery. This means you can either connect the battery to the trailer’s electrical system or disconnect it completely.
| Component | Description |
|---|---|
| Switch | A simple on/off switch controlling the connection between the battery and the trailer’s electrical system. |
| Battery | The 12-volt battery providing power to the trailer. |
| Wiring | Connects the battery to the switch and the trailer’s electrical system. |
The advantage of a single-pole switch is its simplicity and low cost. The disadvantage is its limited functionality; it only allows for complete connection or disconnection of a single battery. It doesn’t offer the ability to switch between batteries or isolate the battery from the charging system.
Double-Pole Battery Switches
A double-pole switch controls two circuits simultaneously. This is often used to isolate both the positive and negative terminals of a single battery from the trailer’s electrical system. This provides a complete break in the circuit for added safety.
| Component | Description |
|---|---|
| Switch | Controls both the positive and negative connections to the battery simultaneously. |
| Battery | The 12-volt battery. |
| Positive (+) and Negative (-) Wiring | Separate wires for the positive and negative terminals, each controlled by the switch. |
Double-pole switches offer improved safety by completely disconnecting both terminals. However, they still only control a single battery.
Double-Pole Double-Throw (DPDT) Battery Switches
A DPDT switch is more complex, allowing switching between two different batteries or sources. This is common in setups with a house battery and a starting battery.
| Component | Description | Component | Description |
|---|---|---|---|
| Switch | Allows switching between two batteries (or a battery and a shore power source). | Battery 1 | (e.g., House Battery) Provides power to the trailer’s appliances. |
| Positive (+) and Negative (-) Wiring | Separate wires for each battery, controlled by the switch. | Battery 2 | (e.g., Starting Battery) Used to start the tow vehicle. |
| Output Wiring | Connects the selected battery to the trailer’s electrical system. |
The advantage is the ability to switch between power sources. The disadvantage is the increased complexity and cost compared to simpler switches. Improper wiring can lead to short circuits, so careful installation is essential.
So, you’re an audiophile who travels? Awesome! Check out this guide on setting up your audiophile travel aetup for the best sound on the go. It’s all about finding the right balance between portability and quality. Then, once you’ve got your portable setup dialed in, consider exploring advanced techniques by checking out another great resource on audiophile travel aetup – it dives into more nuanced aspects of achieving pristine sound while traveling.
These resources will help you create the perfect listening experience, no matter where your adventures take you.
Connecting and Disconnecting Batteries
Connecting and disconnecting your travel trailer batteries using a battery switch is a crucial task for maintaining power and ensuring safety. Improper handling can lead to sparks, short circuits, and even battery damage. This section will guide you through the process safely and efficiently.
Before you begin any work on your battery system, always remember to disconnect the negative (-) terminal first. This minimizes the risk of accidental short circuits. Then, reconnect the positive (+) terminal last. This simple precaution can prevent serious injury and damage.
Safe Battery Connection and Disconnection Procedures
Follow these steps carefully to connect and disconnect your batteries using a battery switch:
- Turn off all power-drawing devices: Before touching any battery terminals or the battery switch, ensure that all appliances and electronics in your travel trailer are turned off. This prevents unexpected surges and potential hazards.
- Locate your battery switch: Usually found near your batteries, the switch will have clearly marked positions for each battery bank (e.g., “House,” “Chassis,” “Both,” “Off”).
- Switch to the “Off” position: This is the critical first step. It isolates all batteries from the electrical system, preventing accidental short circuits during the connection/disconnection process.
- Disconnect (or Connect): Carefully disconnect (or connect) the battery cables at the battery terminals, starting with the negative (-) terminal and then the positive (+) terminal (or vice-versa when connecting). Use appropriate-sized wrenches to avoid damaging the terminals.
- Switch to the desired position: Once the connections are made (or broken), switch the battery switch to the desired position (e.g., “House” to use only the house battery, “Chassis” for the chassis battery, or “Both” to use both).
- Verify power: After switching, check that the power is functioning correctly in the intended circuits.
Best Practices for Maintaining Battery Connections
Proper maintenance is vital for extending the lifespan of your batteries and preventing performance issues. These best practices will help you keep your battery connections clean and secure:
- Clean terminals regularly: Use a wire brush or battery terminal cleaner to remove corrosion from both the battery terminals and the cable ends. Corrosion increases resistance and reduces power delivery. Apply a battery terminal protector after cleaning to prevent future corrosion.
- Tighten connections: Ensure that all battery cables are securely tightened to the terminals. Loose connections can cause overheating and lead to poor performance.
- Inspect cables for damage: Regularly inspect the battery cables for any signs of fraying, cracking, or damage. Replace damaged cables immediately to prevent short circuits or power loss.
- Use anti-corrosion grease: Applying a dielectric grease to the terminals after cleaning helps prevent corrosion buildup. This grease acts as a barrier between the metal and the environment.
Battery Switching Flowchart
This flowchart visually represents the process of switching between your house and chassis batteries using a typical dual-battery switch.
Imagine a flowchart with the following boxes and arrows:
Start -> Turn off all devices -> Switch to “Off” -> Disconnect (or connect) negative (-) terminal -> Disconnect (or connect) positive (+) terminal -> Switch to desired position (“House,” “Chassis,” or “Both”) -> Verify power -> End
Arrows connect each step sequentially. Decision points (like choosing “House” vs. “Chassis”) would be represented by diamond shapes branching to different paths.
Troubleshooting Common Battery Switch Issues
Dealing with a faulty battery switch in your travel trailer can be frustrating, leaving you without power when you need it most. Understanding common problems and how to troubleshoot them can save you time, money, and a lot of inconvenience. This section will guide you through diagnosing and fixing some of the most frequent issues.
Common Battery Switch Problems
Several problems can arise with your travel trailer’s battery switch. These often stem from simple issues like corrosion or blown fuses, but could also indicate a more serious switch failure. Understanding these problems and their causes is crucial for effective troubleshooting.
Troubleshooting Guide
This table provides a structured approach to identifying and resolving common battery switch problems. Remember to always disconnect the battery’s negative terminal before working on any electrical components.
| Problem | Possible Cause | Solution |
|---|---|---|
| No power to appliances when the switch is on. | Blown fuse in the battery switch or related circuitry. Corroded battery terminals or connections. Faulty battery switch. | Check and replace any blown fuses. Clean and tighten battery terminals and connections. Test the battery switch using a multimeter (see below). If the switch is faulty, replace it. |
| Switch feels stiff or difficult to operate. | Corrosion on the switch mechanism. Internal mechanical failure within the switch. | Carefully clean the switch mechanism with a wire brush and electrical contact cleaner. If the problem persists, replacement is likely necessary. |
| Intermittent power to appliances. | Loose connections at the battery, switch, or appliance terminals. Internal switch failure. Corrosion. | Check and tighten all connections. Clean any corroded terminals. If the issue continues, the switch may need to be replaced. |
| Battery drains quickly even when appliances are off. | Parasitic draw (a small current drain even when the switch is off). Faulty switch allowing constant current flow. | Inspect wiring and connections for shorts. Use a multimeter to check for parasitic draw. If a draw is detected, isolate the problem circuit. If the switch is constantly allowing current flow, replace it. |
Testing the Battery Switch with a Multimeter
A multimeter is an invaluable tool for testing the functionality of your battery switch. Before starting, ensure the negative battery terminal is disconnected.To test the switch, set your multimeter to the continuity setting (usually represented by a diode symbol). Touch the multimeter probes to the switch terminals corresponding to the battery and the output circuit. If the switch is working correctly, you should get a continuity reading (usually a beep or a near-zero resistance reading) when the switch is in the “on” position, and no continuity when it’s in the “off” position.
A lack of continuity in either position suggests a faulty switch. Remember to consult your multimeter’s manual for specific instructions. A reading other than what is expected confirms the need for replacement.
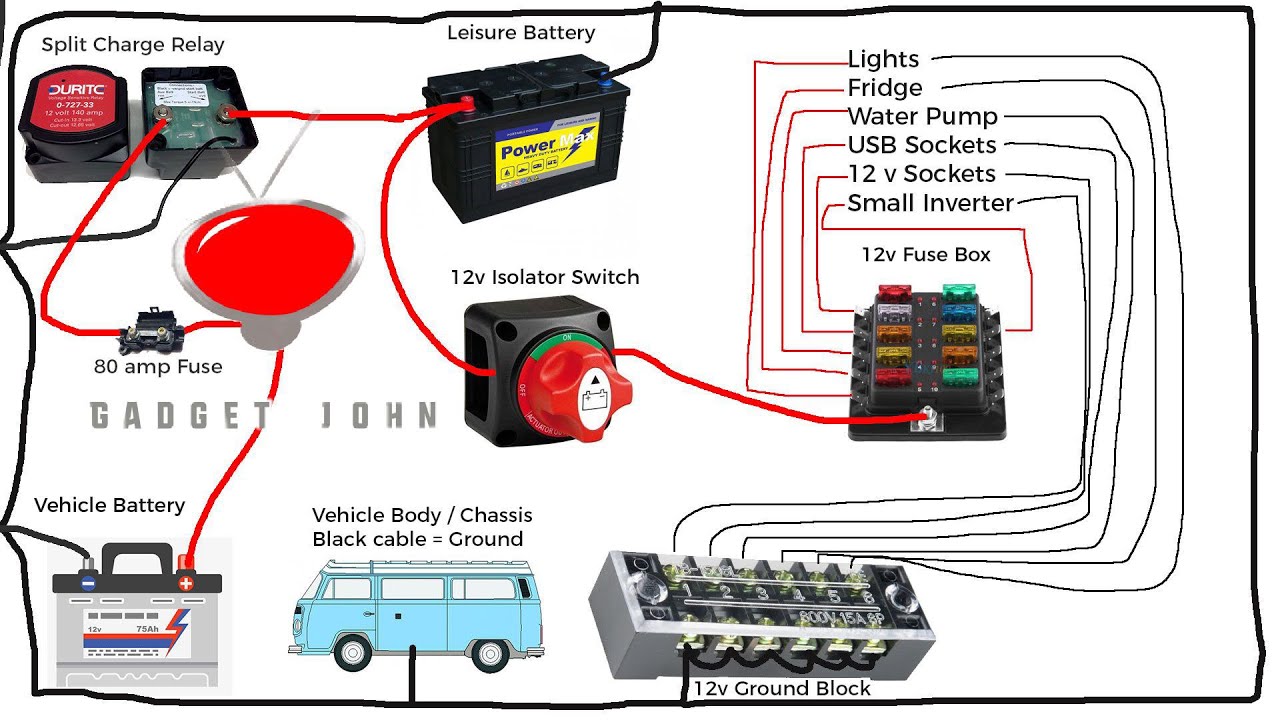
Battery Switch and Electrical System Integration

Your travel trailer’s battery switch isn’t a standalone component; it’s a crucial part of a larger electrical system. Understanding its interaction with other parts like the converter, inverter, and solar panels is key to safe and efficient power management. This section details how these elements work together, providing a clearer picture of your trailer’s electrical flow.The battery switch acts as the central on/off control for your house batteries.
It dictates whether power from the batteries can flow to the rest of the trailer’s systems. Everything from your lights and refrigerator to your water pump relies on this switch, either directly or indirectly. When the switch is off, the house batteries are isolated, preventing accidental discharge or short circuits. When it’s on, power flows to the other components, allowing your appliances to function.
Electricity Flow Diagram
Imagine a simple diagram: Your house batteries are represented by a box labeled “Batteries.” A line leads from the batteries to a box labeled “Battery Switch.” Another line extends from the switch to a box representing your “Converter.” The converter changes 12V DC power from the batteries to 120V AC power for your household appliances. From the converter, lines branch out to various appliances (lights, refrigerator, etc.).
A separate line runs from the battery switch to an “Inverter” box. The inverter converts 12V DC to 120V AC, often for higher-power appliances. Finally, another line connects from the battery switch to a “Solar Panel” box, representing the solar charging system. This line shows the solar panels feeding power back into the batteries through the battery switch.
Safety First: Always disconnect the batteries completely before performing any maintenance on the electrical system. Failure to do so could result in serious injury or death from electric shock. Properly labeled and insulated wires are crucial for safety.
Important Note: This is a simplified diagram. More complex systems might incorporate additional components like battery monitors, charge controllers, and fuses for added protection.
Battery Switch vs. Battery Management Systems
A battery switch offers basic on/off control. More advanced battery management systems (BMS) offer much greater functionality. A BMS might include features like:* Automatic charging: Optimizing charging from different sources (shore power, solar, alternator).
Low-voltage protection
Preventing deep discharge and battery damage.
Remote monitoring
Allowing you to check battery voltage and state of charge from your phone or computer.
Multiple battery bank management
Controlling and monitoring several battery banks simultaneously.While a battery switch is simple and reliable for basic needs, a BMS provides more sophisticated control and protection for your batteries, especially in setups with multiple battery banks or significant power demands. The choice between the two depends on your trailer’s complexity and your budget. A basic travel trailer might only need a battery switch, while a more elaborate setup with solar and multiple batteries might benefit from a BMS.
So, you’re an audiophile who travels? Awesome! Check out this guide on audiophile travel setups for tips on packing your gear. It’s crucial to protect your precious headphones and portable DAC. Then, once you’ve got your travel setup sorted, consider exploring more advanced options like the ones detailed in this other resource on audiophile travel setups – it focuses on minimizing size without sacrificing sound quality.
Happy listening, on the go!
Safety Precautions and Best Practices
Working with your travel trailer’s battery system, including the battery switch, requires caution. Improper handling can lead to serious injury from electric shock, burns, or even explosions from battery gases. Understanding and following safety procedures is paramount for a safe and enjoyable RV experience.Proper use and maintenance of your battery switch are crucial for both safety and longevity.
Neglecting these aspects can lead to premature failure, potential electrical hazards, and unnecessary repair costs. Regular inspection and careful operation will ensure the reliable performance of your battery switch for years to come.
Potential Hazards and Safety Guidelines
Several hazards are associated with improper battery switch use. Direct contact with battery terminals can result in severe electric shock. Sparks generated during connection or disconnection can ignite flammable gases released by the batteries, leading to explosions or fires. Incorrect wiring can cause short circuits, potentially damaging the electrical system and creating fire hazards. Always wear appropriate safety gear, including eye protection and insulated gloves, when working near batteries or the battery switch.
Ensure adequate ventilation to prevent the buildup of explosive gases. Never work on the electrical system if you are unsure of your capabilities; consult a qualified technician. Always disconnect the negative (-) terminal first when working on the battery system and reconnect it last. This minimizes the risk of accidental short circuits.
Extending Battery Switch Lifespan
Proper maintenance and usage significantly extend the lifespan of your battery switch. Here are some key tips:
- Regularly inspect the switch for corrosion, loose connections, and signs of damage. Clean terminals with a wire brush and baking soda paste to remove corrosion.
- Avoid repeatedly switching the battery on and off unnecessarily. Frequent switching generates heat and wear on the switch’s internal components.
- Use a high-quality battery switch designed for the amperage of your battery bank. An undersized switch can overheat and fail prematurely.
- Ensure proper grounding of the battery system. A poor ground can cause voltage spikes that damage the switch and other components.
- Store your travel trailer in a dry place to prevent corrosion of the switch and its connections. Exposure to moisture accelerates corrosion and reduces the lifespan of electrical components.
Correctly Installed and Maintained Battery Switch
Imagine a battery switch securely mounted on a sturdy, dry surface within the travel trailer’s battery compartment. The switch itself is clean and free of corrosion, with clearly marked terminals labeled “+” and “-“. Heavy-gauge wires are firmly connected to the terminals, using appropriate connectors and tightened securely. The switch is easily accessible for operation but protected from accidental contact or damage.
The surrounding area is clean and well-ventilated, with no flammable materials nearby. The negative (-) battery cable is connected to the switch’s negative terminal, and the positive (+) cable from the battery is connected to the switch’s positive terminal. A properly grounded system is critical, with a heavy gauge ground wire connected from the chassis to the battery’s negative terminal, ensuring a complete circuit.
Mastering your travel trailer’s battery switch is more than just knowing how to flip a switch; it’s about understanding your RV’s electrical system and ensuring safe, reliable power. By following the safety guidelines and troubleshooting steps Artikeld here, you’ll be well-equipped to handle any battery-related issues and enjoy countless worry-free camping trips. Remember, regular maintenance and a proactive approach to troubleshooting can significantly extend the lifespan of your battery switch and your overall RV experience.
Questions and Answers: Battery Switch On Travel Trailer Function
How often should I check my battery switch?
Inspect your battery switch at least once a month for corrosion and loose connections. More frequent checks are recommended if you use your trailer frequently or in harsh weather conditions.
What does it mean if my battery switch is hot to the touch?
A hot battery switch indicates a significant electrical problem. Turn off the switch immediately, disconnect the batteries, and seek professional help. This could indicate a short circuit or other serious issue.
Can I use a battery switch with different battery types?
While most switches can handle various battery types (like lead-acid and lithium), check your switch’s specifications to ensure compatibility. Mixing battery chemistries might require specific considerations.
My battery switch is stuck. What should I do?
Try using a penetrating lubricant on the switch mechanism (following safety precautions). If it remains stuck, it’s likely time for replacement. Don’t force it, as this could cause further damage.
